| TinyBooks Pro Info | Download TinyBooksPro.zip | Buy Now (Individuals - US$ 79.) |

TinyBooks Pro Tutorial
(Step-by-Step with Screenshots)
Note: TinyBooks Pro is a Macintosh application. It requires an Intel-based Macintosh computer. See the TinyBooks Pro Requirements page for more info.
Overview
First, THANK YOU! If you're reading this, you've just taken the first step to becoming part of the TinyBooks Pro family, and for that, I thank you. I hope to prove to you that TinyBooks Pro is extremely easy to use as well as being very capable. In this tutorial, I hope to show you how TinyBooks Pro works in a very easy, conversational style. This is actually going to be fun, so don't be intimidated. You'll see...
Let's quickly get one thing out of the way. Just like a Word Processor or Spreadsheet allows you to create as many documents as you want, TinyBooks Pro is just like that also. TinyBooks Pro allows you to create as many documents as you want. Each document you create covers one business (or one family) for one year. The only limitation is that only one document can be open at a time. That's it. So, don't worry. You are not going to be "using up" TinyBooks Pro by experimenting with this tutorial. You can create as many "test" documents or "real" documents as you want. OK, let's get started...
Creating a New Document
When you run TinyBooks Pro for the very first time, you will want to create a new set of books (also known as a TinyBooks Pro document) for your company or family for the current year. As you already know, each TinyBooks Pro document covers one business (or family) for one year. You can create as many TinyBooks Pro documents as you want, but only one can be open at a time. To create a new TinyBooks Pro document, choose the NEW item from TinyBooks Pro's File Menu.
By the way, you'll notice there are actually two different NEW items. There's a NEW (for first time users) and a NEW (with import.) The second NEW is what you'll use next year so that you can easily import all of the customizations that you might have added to your this year's document. But, for now, and for this tutorial, let's choose the NEW item that is designed for first-time users. The "Create a New Set of Books" dialog will then appear. It looks like this...
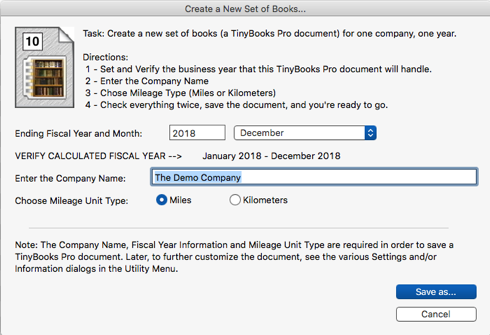
To create a new set of books, TinyBooks Pro really only needs the following two bits of information...the Company Name, and the Fiscal Year...
1 - The Company Name - For this demo, you can see I've typed in "The Demo Company" as the name of the business.
2 - The Fiscal Year - Each TinyBooks Pro document covers "the books" for one company (or family), for one year. You must specify the business year that this document covers. Most people choose a standard "January to December" calendar year. In this tutorial, we'll create a document that covers January to December of 2018.
Note: TinyBooks Pro also supports non-standard Fiscal Years. To choose a non-calendar Fiscal Year, enter the ending month and ending year of your Fiscal Year. Once entered, the program will calculate and display the range of your fiscal year for your verification. Fiscal Years, by the way, are referred to by the year in which the last month of the fiscal year resides. So, for instance, if you were creating a TinyBooks Pro document with a Fiscal Year that runs from March 2018 through February 2019, you would choose February from the popup menu, and type 2019 into the year field.
Saving a New Document
After you enter and double-check the required information, click the SAVE AS button. As with all SAVE AS dialogs, you need to choose a name and a location for this document. TinyBooks Pro will suggest a default name of "ShortCompanyName-Books-2018.tb10" but you're free to name it yourself. Hopefully, you will rename the "ShortCompanyName" part to something that makes sense for your company or family. For this tutorial, I've changed the suggested name to be "TheDemoCompany-Books-2018.tb10". Remember, each document covers one company or family for one year, so including the name of the company (or rather a shortened name of the company) and the year in the name of the document itself is a very good idea.
The suggested name includes a file extension called ".tb10" which denotes that this document was created with version 10 of TinyBooks Pro. Depending on how you have your own Mac set up, the files you save may or may not actually show the file extension. Apple sometimes likes to hide the complexity from users. But, don't worry, even if you can't see it, the file extension is really there.
IMPORTANT NOTE: All of the most important information that TinyBooks Pro knows about your company is stored in this one document that you just created and named. In the future, this is the document that you will double-click to start "doing the books." Unlike other accounting programs that use multiple files to store such information, TinyBooks Pro simply stores everything in this one file. It's easy to find, easy to backup, easy to understand, etc.
Here's a Typical Monthly Window
Once you save your TinyBooks Pro document (also known as your "set of books", or just "the books"), you'll see an empty Monthly Expense/Income Window appear. It will look something like this...
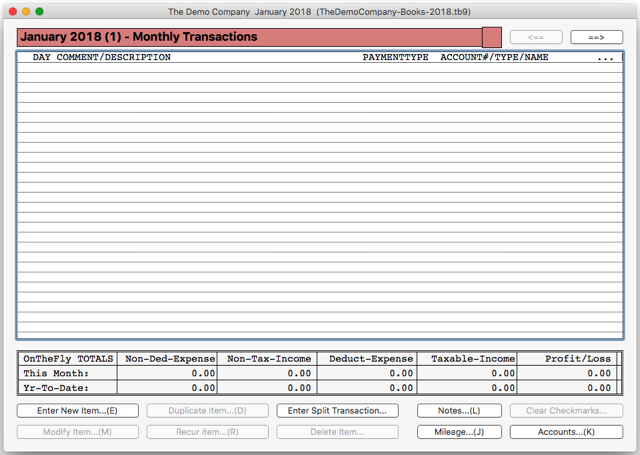
...and, by the way, if the columns you see look a little different than the picture, it might be because you are showing or hiding the Tax fields (which we'll talk about later.) For now, try pressing Command-T (for "Tax") or choosing the "Show/Hide Tax Fields" from the TinyBooks Pro Utility Menu. You can also try enlarging the width of the window to show more columns.
The title of the Monthly Expense/Income Window that appears will include the name of your company, the month and year, and the name of the document. The window is empty, because you haven't yet added any expense or income items.
This window, by default, shows the items in the current month according to the date and time set on your computer. To switch to another month, select it in the Month Menu, or use the left/right arrow buttons on the Expense/Income Window, or use the left/right arrow keys on the keyboard. In TinyBooks Pro, it's really easy to move around...just use the LEFT and RIGHT arrow keys to move around from month to month, and the UP and DOWN arrow keys to move up and down the list of transactions in any month.
NOTE: I created this step-by-step tutorial in July of 2016, but chose to create a set of books for this tutorial as if it were 2018, using a standard January to December fiscal year. So in my case, TinyBooks Pro chose to show me January 2018 when the document was first opened. If you are going through this tutorial at a different time (or with a different choice of fiscal year), TinyBooks Pro might show you a different month than you'll see here.
Monthly Colors
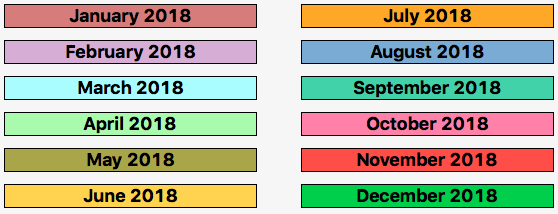
By the way, did you try to move around from month to month using the LEFT and RIGHT arrow keys? If not, try it now! You might note that TinyBooks Pro shows you the month and year with colorful background on the top left of the window. In TinyBooks Pro, each month can be associated with a different color. You can accept the default colors, or customize them yourself. Personally, I prefer a different color for each month, but if you are using TinyBooks Pro to handle the books of many different companies, you might want to have all months show the same color for one company, and a different color for all months of a different company. (See the "Customize Monthly Colors..." item in the Utility Menu for more info.)
A Quick Look At Taxes...YCHHH!
In this tutorial, we're not going to get heavily involved with taxes, since taxes are handled very differently for so many people in different states, provinces and countries around the world. But, before we go on, I do want to at least mention where you'd enter the types of taxes that you might have to deal with depending on where you live. This kind of information is customized using the Company Name and Tax Information dialog. This can be found in the TinyBooks Pro Utility Menu. You should see a dialog that looks something like this...
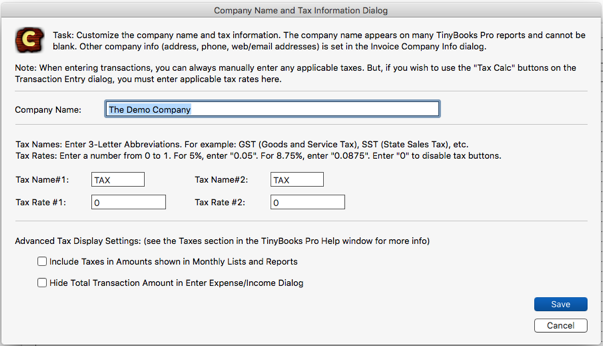
The company name should already be filled in and ready to go. For this demo tutorial, it is assumed, there are no taxes to worry about. But, feel free to enter the names and rates of taxes that are applicable to you. If, for instance, you lived in Massachusetts and had to pay a Sales Tax of 6.25%, you could enter "MST" (for Massachusetts Sales Tax) as the abbreviation for Tax#1 and you could enter "0.0625" for a 6.25% Sales Tax as the Tax Rate#1. In later parts of the tutorial when you are actually entering sample transactions, you can just click the Calculate Tax button on the Item Entry Dialog to automatically calculate the tax fields for you based on the information you've entered here. When this info is entered, just click the SAVE button, and you'll be right back at the main monthly window, ready to enter some expenses and/or income items.
Let's Enter a Transaction
OK, let's enter an actual expense you just paid out (or an income item you just received.) First, if you tried moving around month to month using the arrow keys, buttons or Month menu, make sure you're on the correct month for this expense by checking the title of the window. For this demo, let's make sure we're on January. With the correct monthly window frontmost, just click the Enter New Item button (or press its keyboard equivalent.) When you do, the Enter Expense/Income Item Dialog will appear. Most window positions are remembered, so where my windows and dialogs appear might look a little different than where your windows will appear. The Enter Expense/Income dialog will look something like this...
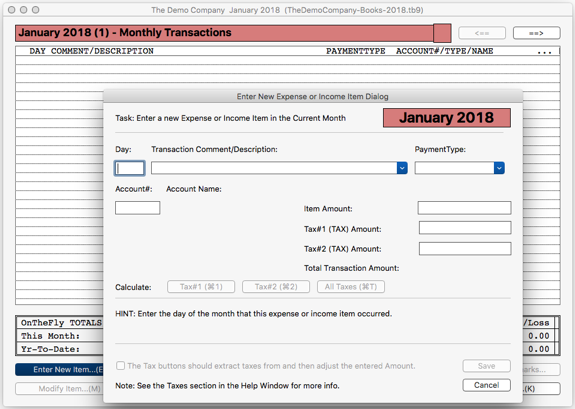
When the dialog appears, you'll enter information about the first expense or income item. You'll typically use the tab key to move from field to field (or shift-tab to move backwards from field to field). The first field, called "Day", is looking for the day of the month in which the transaction occurred. TinyBooks Pro can automatically enter Today's Day for you, or leave the field blank waiting for you to type in the Day, or it can automatically use the last day that was entered. See the TinyBooks Pro Preferences for some additional shortcuts.
Then, you would type a short Comment or description about the item in question. All the comments you enter are remembered automatically. In the future, if the comment you are about to enter is similar or identical to one you entered before, you can choose a comment from the Dropdown menu on the right of the Comment field. In fact, as you type, a previously remembered comment that matches what you've typed so far, will automatically appear "ahead of you". You can just type over it, or you can hit the TAB key to accept the suggestion and go on to the next field. The Comment dropdown menu starts out empty, but will grow as you add new entries, as you'll see in the days ahead.
Hitting tab again, you'll end up in the PaymentType field. If a check was involved in this transaction, you can record its number in the PaymentType field. You can also automatically insert one of the many suggested types of payment, such as Cash, VISA, M/C, ATM, PayPal, etc. I often use the word "Cash" or "Visa" depending on how I purchased the item in question. In this case, let's assume I just purchased 100 First Class Stamps using Cash. As you start typing "Cash", you'll see that happens to be one of the suggested entries. So, you can just accept it by tabbing to the next field (or continue typing what you might have wanted instead.)
After filling in the PaymentType field (or selecting one of the built-in standard entries from the PaymentType Dropdown Menu), you would hit the TAB key again to move to the next field. You would then enter the Account# that is associated with the item you are entering.
WAIT! Don't panic! You don't actually have to remember any account numbers. Though you can enter the account number directly, if you happen to remember it, you can also just type the first letter of the account name you want to use ("P" for Postage, for instance.) A popup list will appear with a listing of all the accounts, and the list will automatically jump to the first account that starts with the letter you just typed. If the first account that starts with "P" isn't the one you're looking for, press "P" again (in this case) and you'll automatically jump to each account that starts with that letter. Click the OK button or hit RETURN and the account name and number are entered automatically.
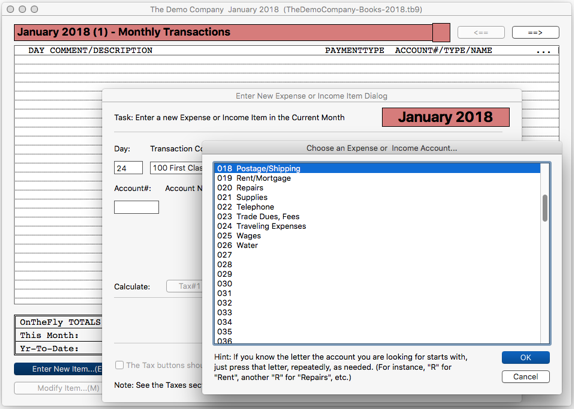
Then, enter the amount of the transaction in the Amount field, click the Save button and you're done.
Remember, for this tutorial, we're ignoring taxes. But, quickly, and as you might guess, if you did have to enter taxes associated with this transaction, you could just enter them like you enter any other amount field. And, if you defined actual tax rates in the Company Name and Tax Information dialog, you could also use the Tax Calc buttons to automatically calculate the taxes for you. For more complete information on tax handling, see the Taxes section of the built-in Help Window in TinyBooks Pro itself.
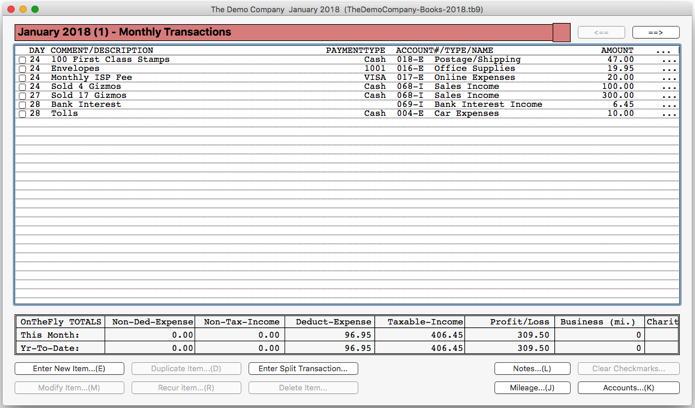
When you click the SAVE button, note that the main monthly window now shows the item you just entered.
In the picture here, if you're observant, you'll see that I've added a few additional transactions too. As you also can see, income items are handled in the same way as expense items, just using different accounts.
Also, notice that the bottom of the window instantly calculates many important totals "on the fly" as you enter each item. A quick glance shows a few of the most important totals for the currently displayed month (top row), and for the year-to-date (bottom row.) The totals shown include the Non-Deductible Expenses, Non-Taxable Income, Deductible Expenses, Taxable Income and Profit/Loss. (Further columns in the same area show totals for Business, Charitable and Medical mileage which we'll get into later.)
A Quick Note on Saving
When you use TinyBooks Pro, pretty much the only thing you have to explicity SAVE is the document that you first created. And, you already did that above. That's really the only time you have to manually save something. From then on, every time you make any kind of change to the document you are working on, TinyBooks Pro saves the file for you. When you enter a new or modify an existing transaction, TinyBooks Pro saves the information for you. If you make company name changes, or account name changes, or add invoices, or checks or whatever, TinyBooks Pro makes sure the info you've changed is saved. You can even quit TinyBooks Pro at any time, if there was something that needed saving, TinyBooks Pro did it for you. Nice and simple.
If you're using the Mac's own Time Machine, you are probably enjoying the benefits of automatic backups without worrying too much about it. But, if you'd like to be extra careful (as you always should when it comes to backing up), you can explicitly save a backup copy of the document you are working on using the "Backup" item in TinyBooks Pro's File Menu.
Did You Notice the Checkmarks?
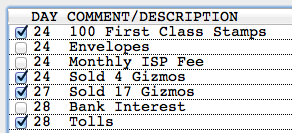
You may have noticed that there are checkboxes on the left side of every transaction line in the Monthly Window. These are called Checkmarks, and you can use them for whatever purpose you might like. The checkmarks might be used as placeholders to remind you of particular locations in a long list of transactions, or they might be used temporarily to help you to reconcile a credit card or checking account statement. Just click on the checkbox to add a checkmark, and click it again to remove it. You can also use the button on the bottom of the Monthly Window to remove all the checkmarks in the current month. (Hold the option-key down and click the button to delete the checkmarks from all months, not just the current month.)
If you click in the OnTheFly Totals area of the window, it will change to show the Checkmarks Info display. This will display the totals (for the current month and all months) of just those items that are checked. This makes checking or credit card reconciliation a snap!
ACCOUNTS! ACCOUNTS! (must be important, all caps!)
After you've entered a few items (or a few months worth of items), you will likely want to see where you're spending your money, what's working, what's not working, etc. A good place to start is with the Accounts Dialog. Choose the Accounts item from the Utility Menu. You will see a dialog that looks something like this...
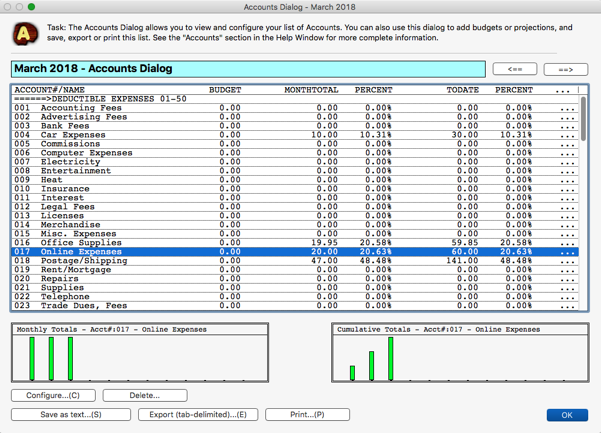
This Accounts Dialog shows you all of your accounts, and the totals for each account for the current month and the totals to date (meaning from the beginning of the year through the current month). Also displayed are the percentages that each account represents, compared to the applicable subtotal of that particular type of account. This dialog is also used to add, modify or delete accounts to suit your own business (or family) needs.
Again, if you are very observant, you might notice, that for the purposes of this tutorial, I made a few changes. I made exactly the same entries for February and March that I made for January. I adjusted the Accounts dialog to show March instead of January, and I happened to scroll down to the Online Expenses line. Take a look and you should see that the year-to-date total ("ToDate") for that account (#17, Online Expenses) seems to be three times as much as the total just for March (in the "MonthTotal" column.)
Account Types, Ranges, etc.
Before we get more into the Accounts dialog, and if you haven't already done so, use the UP and DOWN arrow keys to scroll all the way through the listing of accounts. What do you see? Well, there are various sections within the Account List...the first section shows those accounts that are designed to hold Deductible Expenses, another section handles Non-Deductible Expenses. This is followed by Taxable Income range of accounts, and a Non-Taxable Income range of accounts. These are the four standard types of accounts.
When you create a new document, TinyBooks Pro automatically creates for you a standard list of such accounts, but you can customize them to your liking. If you scroll even further down the Account List, you'll see some very specialized accounts that are used to keep track of Taxes, Profits, Mileage, etc. (These special accounts at the end of the list are not user adjustable.)
No doubt, by default, TinyBooks Pro includes many accounts that you do not need or want. So, feel free to delete them. To delete an account that you don't think you'll ever need, just click its name in the Account List, and click the Delete button. (Obviously, if there's activity in that account, it can't be deleted. You can only delete unused accounts.)
If you wish to rename or add an account, select its name (or a still unused entry in the Account List) and click the "Configure" button. Then enter the new name as desired, but, be sure the newly named account resides in the correct section of the Account List. The position of an account in the list is very important. As you scroll through the list of accounts, remember that there's a section for each type of account...Deductible Expenses, Non-Deductible Expenses, Taxable Income and Non-Taxable Income. Make sure you are adding or renaming an account in the proper section as desired.
Account Bar Charts

In fact, now is a good time to point out the bar charts on the bottom of the Accounts Dialog. As you move up and down the list of accounts, the bar charts will automatically and graphically show you trends on any account. Note in this case, that we are in the month of March, the 3rd month in our year, and "Online Expenses" happens to be highlighted. It's easy to tell at a glance that our monthly online expenses have held constant...since all three green bars are the same height. But, if you look at the Cumulative chart on the right, you'll note that, cumulatively, the trend is rising, as it should, since your total expenses for the year for that account are rising. Try using the arrow keys on the keyboard to move up and down the list of accounts, and watch the charts adjust themselves instantly. Try to get a feel for the bar charts. After a while, you'll be able to spot trends instantly.
Budgets in Bar Charts
You might also note that you can set a monthly budget (or projection, or "best guess") for this account in the "Configure" dialog within the Accounts dialog. Budgets are optional, but so easy-to-use, it's a shame not to try it. A budget is just a guide, it lets you estimate what you think (or hope?) will be a standard monthly amount for some account. You can enter a budget for expense or income accounts. An expense budget might be your best guess as to how much you'll spend for a certain expense type each month. An income budget might best be thought of as your best guess as to how much income of a certain type you believe you should be making each month. Your budget numbers will ONLY appear in these bar charts, as a blue line. Budgets are not included in any displayed or printed reports, they do not affect any calculations, and only serve as a visual guide or reminder to you as to how an account is progressing through the year compared to your expectations.

This little snippet of a picture shows what the bar charts would look like after you set a budget for a particular account, but haven't yet added any transactions to that account. Imagine that you set up a new Taxable Income account (called Computer Consulting, maybe??), and set a budget (a hopeful best guess) that you would earn, say, $1000.00 each month. Now, imagine that you use the arrow keys on the Accounts Dialog to move to the last month of the fiscal year. We have NOT yet entered any actual income received for this account, so there are no green bars in the bar chart. But, you should be able to see the blue budget lines. The monthly budget (projection) is the same each month, so each month on the left hand bar chart shows a constant blue budgeted value...that's how much income you are expecting each month. But, cumulatively, on the bar chart on the right, you can see that a fixed monthly budget results in a linearly increasing step in the blue budget line. When you enter actual income items for this account, you'll be able to see whether the income is above or below expectations (that is, whether the green bars are above or below the blue line.) See the next picture...

In this picture, imagine that you did have some consulting income in the months of April, May and June in the amounts of $750, $1250, and $1500 but that you didn't have any other consulting income for the rest of the year. Now, again, if we use the right-arrow on the Accounts Dialog to move to the final month of our fiscal year (December, in this case), we would see the picture shown here. Can you make sense of the charts? On the left, note that the first month that we had income, it was below our best guess (that is, below the blue budget line.) But, the next two months, we were a little above our best guess. On the right bar chart (the one that shows CUMULATIVE totals) it shows the totals levelling off and getting further and further away from our budget (our best guess) because we didn't have any more income of that type since the 6th month of the year. The idea of budgets (estimates, best guesses, projections, etc.) is as valid for income as it is expenses. In this example, we used Consulting Income as an example, but the identical approach is used for expenses too.
Advanced Note: For those curious about some of the technical details, you might note that the minimum and maximum values of the vertical axis of the left and right bar charts might not be the same. The charts should be viewed in relative not absolute terms. The bar charts accurately show trends in relative terms. For absolute numbers, you must view the list of accounts in the Accounts dialog.
And, by the way, best of all, I think, is that all of this happens automatically for you. You don't have to call up a bar chart, or set limits or any kind of specifications at all. It all just happens on its own, automatically, instantly, every time you make any change in your accounting data. Any time you want, without any work at all on your part, just bring up the Accounts dialog, and scroll up and down the list of accounts...you'll see how you're doing at a glance. Who says accounting can't be fun!
Reports and Transactions Search Window
Another powerful feature of TinyBooks Pro is its ability to generate both standard and custom reports. Usually, the Bottom Line Reports and listings available from the Accounts dialog are sufficient for all needs, but when a custom report or search is needed, TinyBooks Pro is ready. Select the "Reports and Transactions Search" item from the Utility Menu. A window will appear that looks something like this...

As you see, this feature gives you the flexibility to generate just about any kind of report you can think of. And, by the way, please note that I'm using the word Report loosely now. The real accounting reports are available in the Bottom Line Reports and the Account dialogs. But, the Reports and Transaction Search window is still a very powerful search facility. You can request reports that only include certain accounts, or only if transactions include a particular keyword, etc. In the example shown here, I searched for any expense, occurring at any time during the year, that had the word "envelopes" in the item's description.
Note that in addition to an Expense or Income Report, TinyBooks Pro also includes a type of report that includes ALL types of entries (that is, both expense and income.) This makes it extremely easy to view, print or export all the transactions you've made all year (or any portion of a year) without having to re-visit each monthly window.
This dialog is an extremely flexible way to do some very particular kinds of reporting on a chosen subset of your transactions. For instance, if you have carefully included the name (or initials, or ID#, etc.) of a particular client in the Comment/Description field of every entry, it's a piece of cake to get a per-client profitability report. If you generate a report including both income and expenses, the resulting total represents the total of all income items matching the given criteria minus the total of all expense items matching the same criteria...effectively, the profit generated from a particular client!
The Bottom Line Report
(An Accountant's Dream!)

OK, it's the end of the year, you've entered all of your expenses and income items, and your accountant is screaming for some actual information from you. What do you send? Why, the "Bottom Line Report" of course. You can find this in the TinyBooks Pro Utility Menu. This is a very simple report that includes just about everything an accountant might want. At the end of the year, this is the report that I would print to help me figure out my taxes.
Notice that there's only a single parameter that needs to be set. You just have to specify whether you want the report to cover a particular quarter of the year (1st, 2nd, 3rd or 4th), or the Full Year. At the end of the year, you'd naturally select the Full Year Report. And, that's it! That's got it all! The report that appears is an absolutely complete breakdown of the sum of all of your expenses, income, mileage, taxes paid in and/or out, profits, etc. This is exactly the summation of your business year that your accountant (or YOU) would need to be able to fill out your taxes.
Professional Invoice Printing
(Invoices, Estimates, Proposals, Statements, Purchase Orders, etc.)
TinyBooks Pro also includes a very handy, professional Invoice Printer. You can find "Invoice Printer..." in the Utility Menu. It really is quite simple. Many programs that include the ability to print invoices get very complicated very quickly because you often have to deal with paid and unpaid invoices, and sent and un-sent invoices, listing some invoice amounts as part of an Accounts Receivables module and not listing others, etc. With TinyBooks Pro, all the Invoice Printer really does is print professional-looking invoices (and other forms). That's all. Nice and Simple!
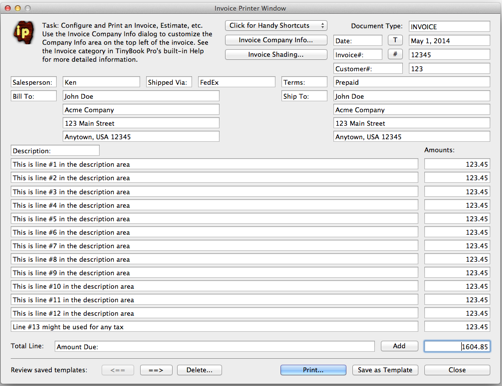
Choose "Invoice Printer..." from the Utility menu of TinyBooks Pro, and the Invoice Printer dialog will appear. Here, you can fill in all the various invoice fields (Date, Customer Number, Invoice Number, Bill To, Ship To, etc.) and then TinyBooks Pro will print a professional-looking Invoice, and on plain paper too, so there's no expensive custom or 3rd-party forms that need to be purchased.
By the way, I'm using the word Invoice a lot, but make no mistake, this dialog is VERY flexible. In addition to Invoices, you can also print Estimates, Proposals, Statements, Quotes, Receipts, Purchase Orders or virtually any other form you might require.
Note that not only can you customize the information in the standard fields, but you can also customize the field names themselves! For instance, if you do not want to use the field called "Salesperson", you can easily change the name of that field to Saleswoman, Salesman, Technician, Broker, Officer, Therapist, etc. If you don't want a "Shipping" field, you can leave it blank, or change it to Postage, UPS, FedEx, or whatever else you might want.
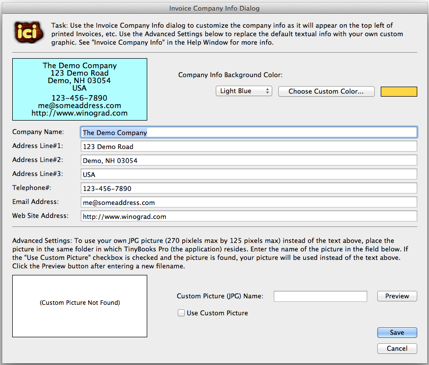
The upper left portion of a typical invoice is where your company name and details reside. To set this info, choose the Invoice Company Info dialog from the Utility Menu. (You can also press a button on the Invoice Window itself to bring up the Invoice Company Info dialog.) This is where you'll enter the company name, address, phone, email address, web site and more...as you would like it to appear on your invoices.
Advanced Note: In the example shown here, I've chosen to just enter the textual information to be used in the Company Area of a printed invoice. I've also chosen a Blue Background for this info. But, if you look carefully at the bottom of the dialog, you will note that you also have the ability to substitute your own customized picture so the company area matches the "style" of your company. Please see the Invoices section of the built-in Help Window within TinyBooks Pro itself for more detailed information how to include a personalized Company Info picture.
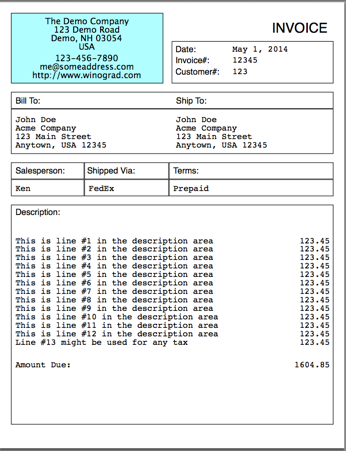
Here's a shrunken picture of what our little demo invoice might look like when printed. You'll notice that, by default, other than the blue background that I've chosen for the Company Area, the rest of the invoice is simply black text on a white background. (If printed on a non-color printer, the blue background will become a shade of gray.)
And, speaking of color, I've added a way to completely colorize your invoices. By default, black and white still rules, but you can easily colorize various portions of an invoice as desired. Your invoices can appear standard black and white, gray scale, elegantly colorful, or, well, totally ridiculous. If you want to experiment with some wild color combinations, just choose the Invoice Shading dialog from the Utility Menu. (You can also invoke the Invoice Shading dialog using a button on the Invoice Printer window itself.
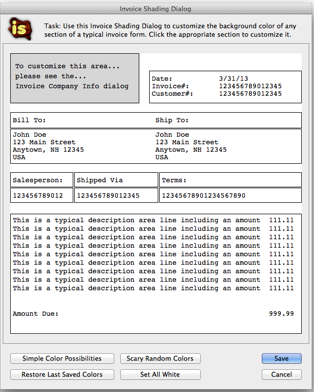
Here's what the Invoice Shading Dialog looks like. Try out some of the buttons on the bottom of the dialog to experiment with various random color combinations. (Be forewarned...they may give you some good ideas, but they are going to be wild!) If you want to individually change the color of any section of the invoice, just click on that portion of the picture of the invoice in the dialog. When you do that, a standard Color Picker dialog will appear and allow you to choose a color for just that portion of the invoice. Experiment and have some fun. And, if you happen to come up with a perfectly elegant looking colorful invoice, please send me a picture and I'll certainly try to include it in the built-in list of "Simple Color Possibilities" that I've already chosen.
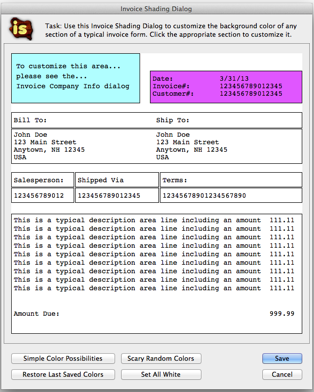
Here's a picture of the Invoice Shading dialog after I've clicked on the Date area of the invoice, had the Color Picker dialog pop up, and picked a purple-ish color.
Today, many people have access to color printers, but even if you don't, remember that you can also send an invoice as a PDF file via Email. Just choose PRINT as usual, but when the Print dialog actually appears, instead of clicking on the Print button, choose the PDF pop-up menu instead. Save your colorful invoice as a PDF, then email it! Fun, fun!
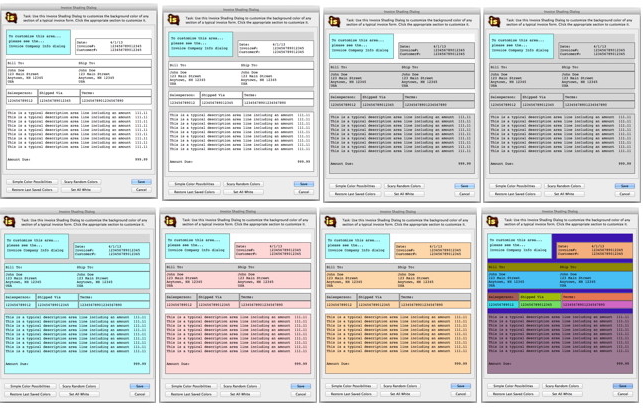
Here's what the Invoice Shading dialog might look like after I've made a few colorizations of my own. Note, as mentioned above, that, by default, the typical invoice is simplyl black on white, but by clicking on various portions of the simulated invoice form on the dialog, you can adjust the colors. You can make subtle changes or bold changes, colorful or grayscale, elegant or even extremely annoying! :-) Who says accounting can't be fun!
TinyBooks Pro actually automatically stores a number of the invoices (or other forms) that you've printed. So if you need to print an invoice (or other form) that you know is very similar to one you've printed before, you can just click the arrow buttons on the Invoice Printer window until you find a similar looking invoice (or other form) to the one you know you want to print. Modify a field or two as desired, and click the Print button. Voila! You get a professional-looking invoice (or other form) with hardly any work. The Invoice Printer window also includes a Handy Shortcut Popup Menu that allows youto speed up some standard chores...copy the "Bill To" name and address fields to the "Ship To" name and address fields, automatically change the field names to those suitable for various types of forms, clear all the data fields, etc.
Professional Check Printing
TinyBooks Pro also includes a very handy, professional Check Printer. You can find "Check Printer..." in the Utility Menu. Unlike the Professional Invoice Printer (described above) which prints all sorts of forms on plain white paper, the Check Printer does require pre-purchased, customized check forms with your banking info, company name and/or logo already printed them on. It might sound complicated, but it's really not! Here's why...
I've done the legwork so you don't have to. I've made arrangements with a company that manufactures check forms, and have designed check forms that exactly match the requirements of TinyBooks Pro. When you order checks for TinyBooks Pro, they'll work first time, every time. No measuring, no experimenting, no wasted checks. This link will take you directly to the Buy TinyBooks Pro Checks page: http://www.winograd.com/checks. You can also order checks by phone, toll-free, using this number: 800-544-3427

Here's a rather shrunken picture of the Check Printer window. As you enter information into the text fields on the bottom of the window, the example check form will automatically show you what the printed check will look like.
Similar to the Professional Invoice Printer window, you can instruct TinyBooks Pro to remember any check you've customized, so that you can use it as a template for a future check when the need arises.
There's also a checkbox which you can use to either include or not include the Name and Address of the person to whom you are sending the check. TinyBooks Pro checks with the Name and Address of the payee printed on them will fit perfectly into special envelopes also available from the same company that prints the check forms as shown above. Again, no guesswork on your part. Just visit the Buy TinyBooks Pro Checks page, and the correct check forms and envelopes will be the only ones you can choose!
By the way, everyone who buys TinyBooks Pro, will automatically receive an Introductory Discount Code offering 25% Off and Free Shipping on your first order of checks and/or matching envelopes.
Mileage (or Kilometers too!)
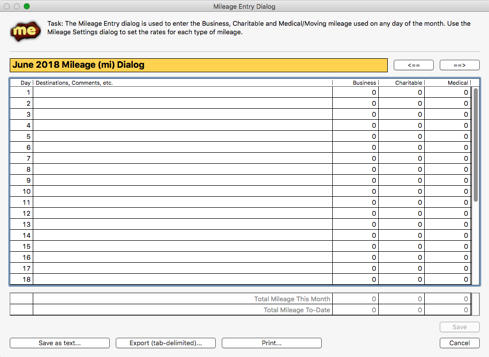
TinyBooks Pro also allows you to easily enter mileage that you've driven over the year. You can find the "Mileage Entry..." dialog in the Utility Menu. Very similar to the way you navigate around other windows in TinyBooks Pro, you can use the arrow keys to navigate left and right (through the months) or up and down (though the days) to view and/or modify the mileage. Note that TinyBooks Pro keeps individual track of Business, Charitable and Medical mileage, as many governments handle different types of mileage in different ways.
You might also note that the Mileage Entry dialog just allows you to enter the mileage (or kilometers) that you've driven, but, so far, at least, the cost of those miles driven haven't been calculated. The totals that you see in the Mileage Entry window, and in the special "On-the-Fly" totals on the main Monthly Windows, are the totals of miles (or kilometers) driven, not the cost of that mileage.
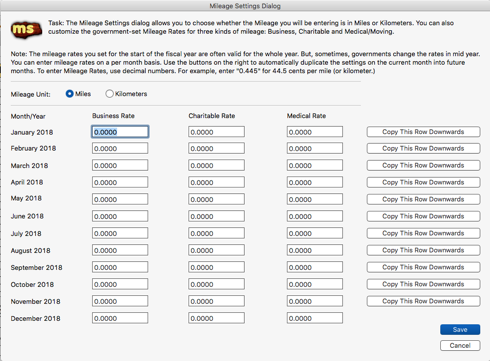
To determine the costs of the mileage you've entered, you'll need to tell TinyBooks Pro whether you're using Miles or Kilometers, and the amount that your government allows you to deduct for each mile (or kilometer) for each of the various types of mileage (Business, Charitable or Medical) that TinyBooks Pro handles. This is done using the Mileage Settings dialog, which can be found in the Utility Menu.
This dialog might appear a little daunting at first, but it's not so bad. You'll see. First, you just choose Miles or Kilometers. This mainly just determines the labels and abbreviations used when Mileage is listed in windows or reports. (By the way, I looked it up...Mileage really is a generic term and can also mean a sum of kilometers as well as miles!)
The rest of this dialog is where you enter the actual cost (per mile or kilometer) of each type of mileage. It only looks complicated because, governments being governments, they like to change things. And, they will often change the amounts that you are allowed to deduct for mileage in mid-year. When you enter the rates (amount per mile or km) for a particular type of mileage for, say, January, you can just click the "Copy this row downwards" button, and the program will automatically copy the mileage rates you've entered into the later months of the year. That MIGHT be all you have to do for the whole year. But, if the government changes the rates, say, starting on the first of June, you can just enter the new rates in the June row, and then, choose the appropriate "Copy down" button on the same row to make the changes to the months beyond June.
Now that you've set the rates for the varying types of mileage, you might notice that if you look at the Accounts dialog, and scroll down to the bottom of the list, TinyBooks Pro has automatically calculated for you the actual cost of the various types of mileage you've driven in any month, or to-date. What you do with these total costs is up to you. TinyBooks Pro tallies the totals for you, but only you can decide, based on where you live and the laws in force at the time, how to handle such costs. (For instance, you might want to make a single end-of-year Deductible Expense entry for the cost of business-related mileage, but this all depends on where you live and the laws of the government where you live.)
The Peruse TinyBooks Pro Documents Window
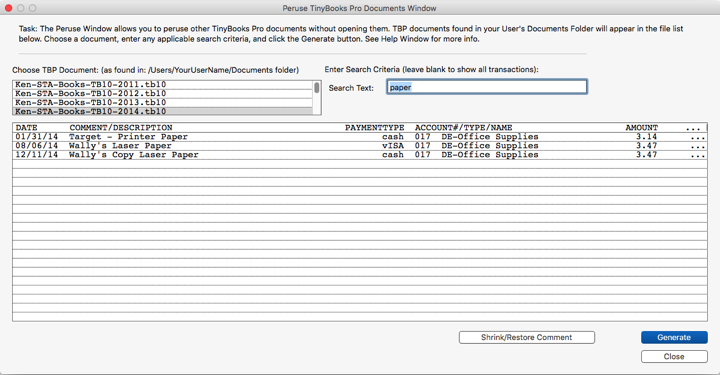
The Peruse Window can stay open all the time (whether a regular document is open or not), and it allows you to "peruse" ALL other TinyBooks Pro documents you've ever created from previous years, other companies, family documents, etc. All of your TinyBooks Pro documents are a click away from being easily searched.
Now, WHY is this so special? It's special because there's one type of question that you always seem to want to ask TinyBooks Pro, but to get the answer always required some extra legwork. But, not anymore.
The problem is simply that the way TinyBooks Pro is (was!) structured was that you could only examine the currently open document. What if you wanted to ask a question that could only be answered by looking at a previous year's document?
Imagine this: Your printer ran out of paper, and you remember getting a great deal on printer paper when you last bought it. So, you search your current document in TinyBooks Pro and find nothing. Why? This is probably because it's very likely you purchased the pack of paper in a previous year. And, that year is NOT easily searchable, unless you close the currently open document and then find and open the past year's document and check that. Then, finding the answer, you have to re-open your current document. That's a bit of a drag. But, not anymore.
Now, the always-open Peruse Window can answer all such questions in no time at all. All of your TinyBooks Pro documents are easily selectable and searchable with just a few clicks. It's simple, and easy. When did I buy that toner? Where did I get it from? Did I buy it from Amazon or eBay? How long have I had my printer? I wonder if the 3-year warranty expired? Did I pay for that printer with a check or a VISA card? The answers to these kinds of questions are now easier than ever to find.
In the reduced-size picture above, you'll see the Peruse Window already knows about my previous documents from 2011 and beyond, and puts the name of each document in a list on the top left of the window. I just clicked one of them (my 2014 books in this case), put the word "paper" in the Search field, and clicked the Generate button. I immediately found when and where I bought the printer paper. If you're just starting TinyBooks Pro now, this feature might not mean a lot, but next year and in years beyond, I'll bet you'll use this window all the time!
Guess what? That's it!
That's it? Really? We're done? There's no more to learn? Did we cover every little bit of TinyBooks Pro? Well, No, definitely not. But, hopefully, I've given you a little taste of what you can do with TinyBooks Pro. I hope you know that you can't really hurt the program, and you can create as many documents as you want (only one open at a time), and you can have some fun. Feel free to experiment.
By the way, when I get a new program, any program, doesn't matter what kind, the first thing I often do is just to "peruse the menus"...just to see what's available. If you "peruse" the TinyBooks Pro menus, you'll see that there's a lot more cool conveniences available to you than what we discussed here. For instance....
You can copy an item from one month to another, you can move an item from one month to another, you can import and export transactions, you can adjust the colors of just about everything, you can customize how the Auto-Comments feature works, and you can customize the Auto-PaymentType suggestions too. You can Split Expenses and Recur Expenses. You can add Notes to each and every month. You can LOCK a file so you can work with a document without fear of accidentally modifying it (and then you can save the unsaved changes if you wish, or discard them.)
Did you know that there are tons of "interim forms" that you can create too? Some people like to keep TinyBooks Pro open all the time, and enter new items directly into TinyBooks Pro as soon as they occur. Others (like me, actually) prefer to keep a paper record of transactions and then enter all of the items into TinyBooks Pro at the end of each month. TinyBooks Pro can create all sorts of forms (for any month, or even the whole year) to make it easy for you to do just this. You can "FIND" any word in any transaction in any month. And, what if you want to "SORT" the items listed in a month, yup, you can do that too. So, just play around, experiment, and have fun with TinyBooks Pro.
Lastly, and most importantly, THANK YOU! I hope you will soon be part of the TinyBooks Pro family.
| TinyBooks Pro Info | Download TinyBooksPro.zip | Buy Now (Individuals - US$ 79.) |
Last Modified: February 14, 2020
